[Deep Learning] Transformer & BERT, GPT

Transformer: Attention is All You Need

Transformer란?

  • 기계 번역을 위한 새로운 모델로 이전에 등장했던 Attention 메커니즘을 극대화하여 뛰어난 번역 성능을 기록했다.
  • 최근 자연어 처리 모델 SOTA(State-of-the-Art)의 기본 아이디어는 거의 모두 트랜스포머를 기반으로 하고있다.
  • 트랜스포머는 RNN 기반 모델이 가진 단어가 순서대로 들어오기 때문에 처리해야하는 시퀀스가 길수록 연산 시간이 길어진다는 단점을 해결하기 위해 등장한 모델이다.
  • 모든 토큰을 동시에 입력받아 병렬연산하기 때문에 GPU 연산에 최적화되어 있다.
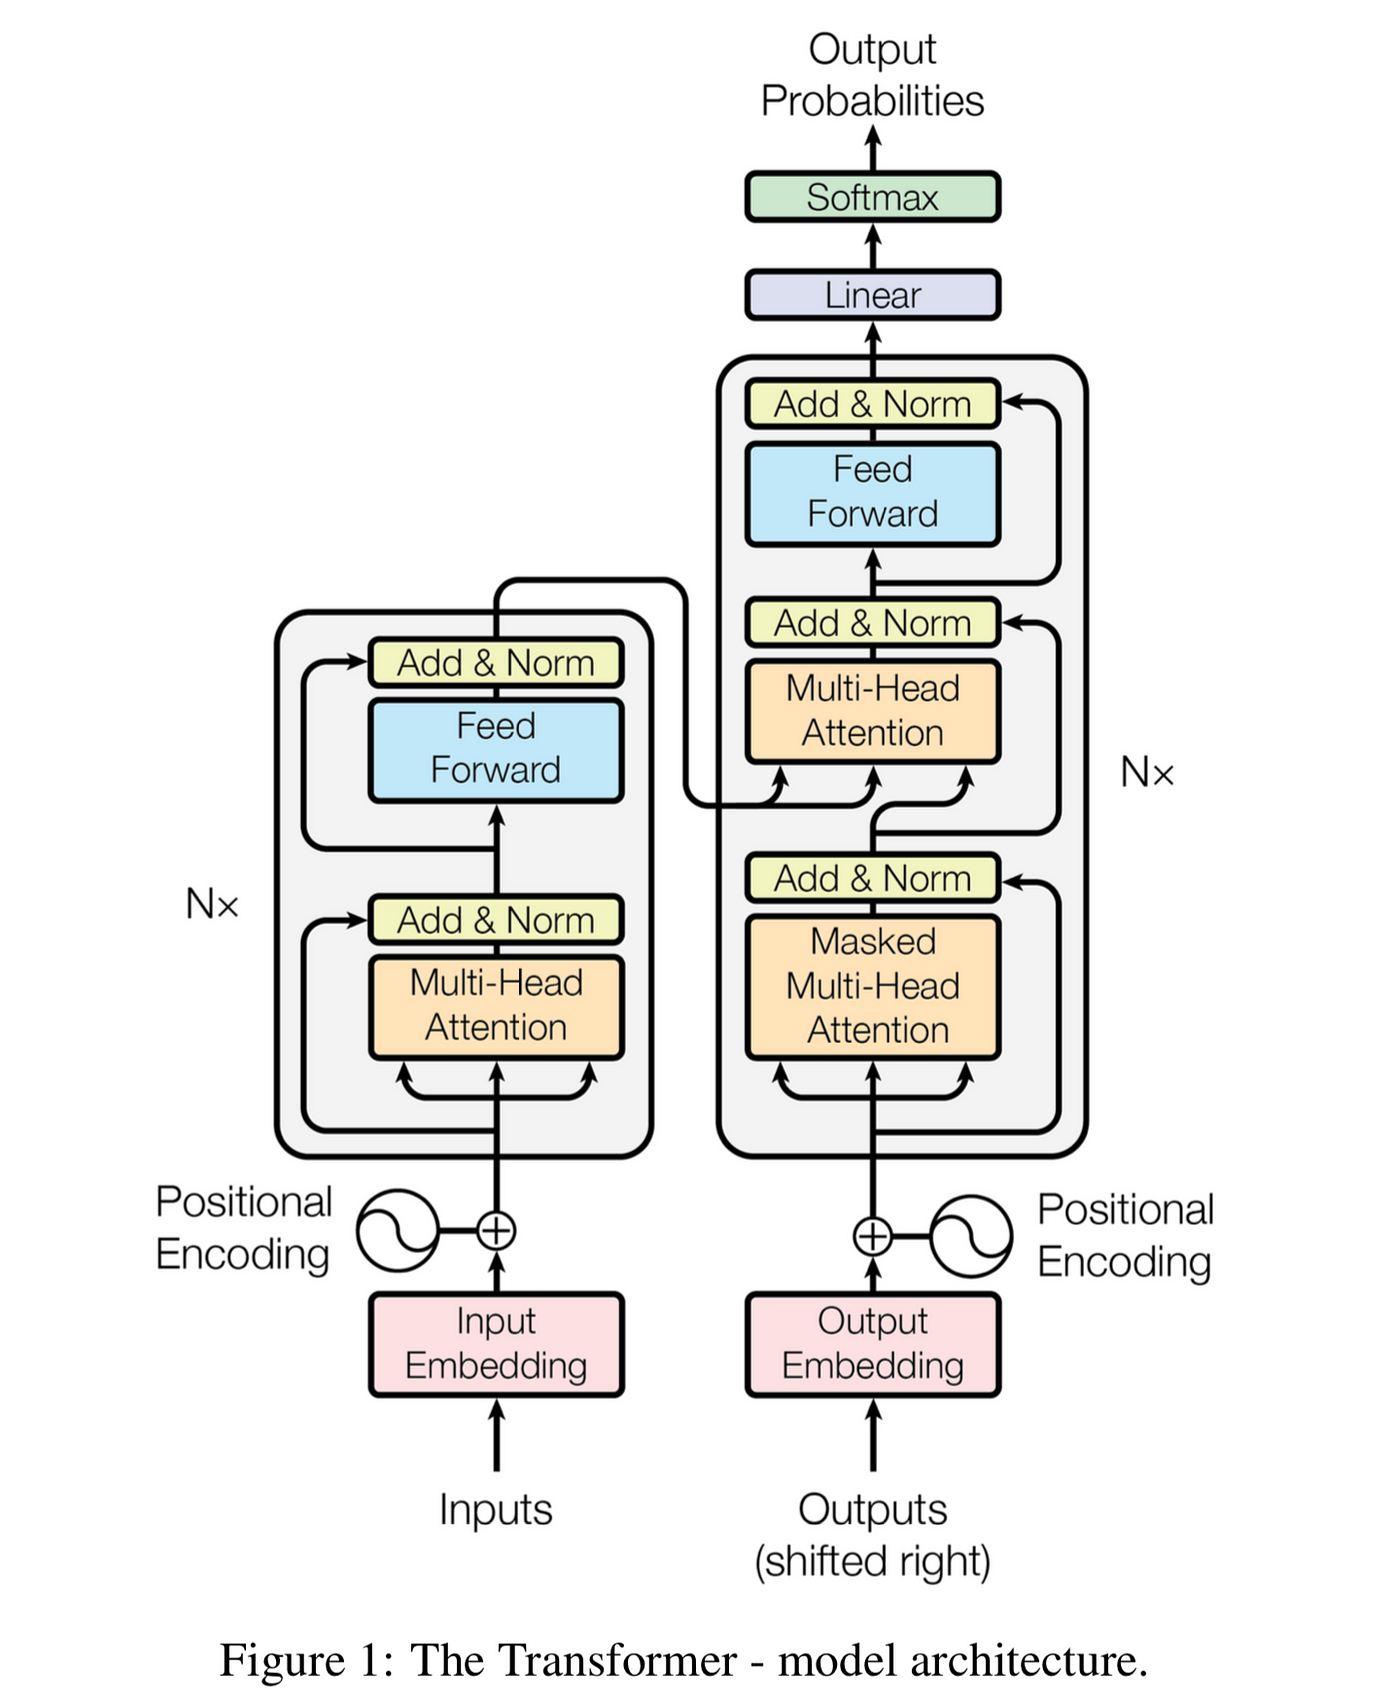
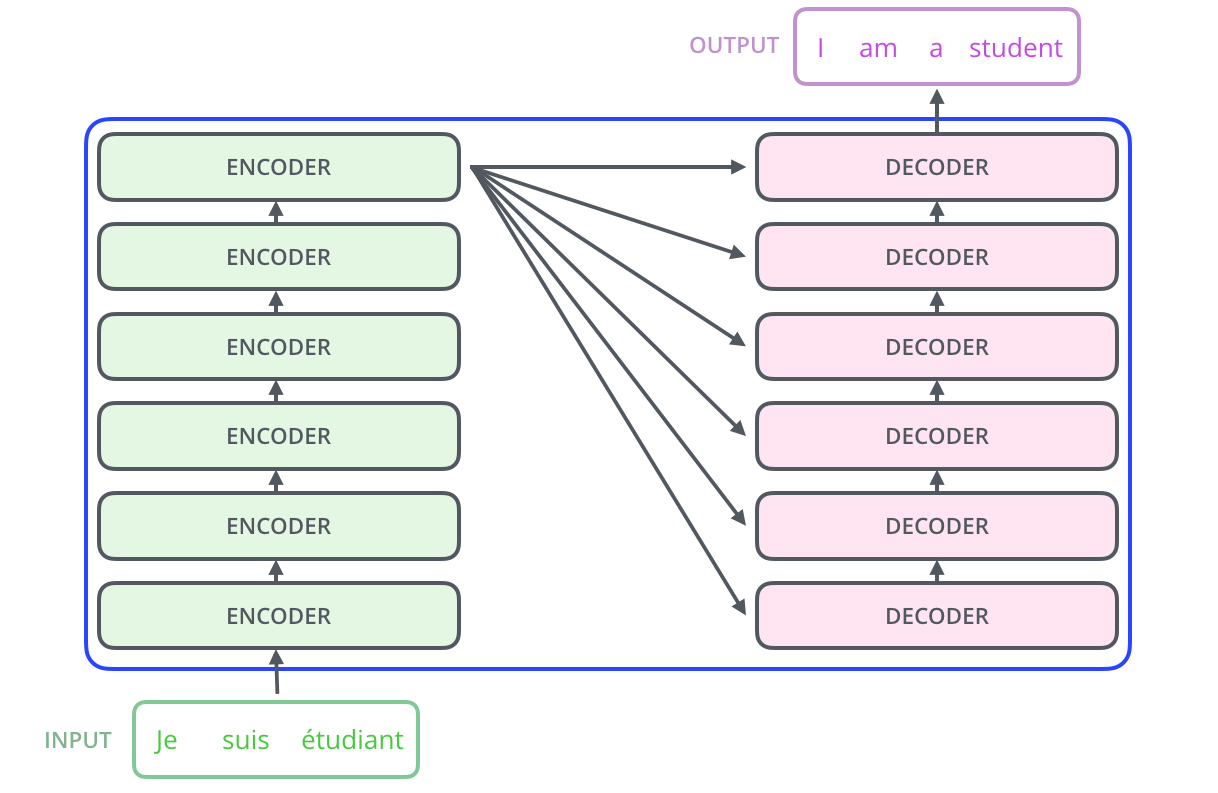
  • 인코더, 디코더로 표현된 사각형을 각각 인코더 블록과 디코더 블록이라고 한다.
positional_encoding

positional_encoding

  • 위 그림은 트랜스 포머의 구조를 나타낸 그림이다.
  • 커다란 회색 블록 2개가 각각 인코더 블록, 디코더 블록이다.
  • 인코더 블록은 크게 2개, 디코더 블록은 3개의 sub-layer로 나뉜다.

Positional Encoding

  • 트랜스포머에서는 병렬화를 위해 모든 단어 벡터를 동시에 입력받는데, 위치정보를 제공하기 위해 포지셔널 인코딩을 진행한다.
\[\begin{aligned} \text{PE}_{\text{pos},2i} &= \sin \bigg(\frac{\text{pos}}{10000^{2i/d_{\text{model}}}}\bigg) \\ \text{PE}_{\text{pos},2i+1} &= \cos \bigg(\frac{\text{pos}}{10000^{2i/d_{\text{model}}}}\bigg) \end{aligned}\]

시각화

  • 일정한 패턴이 있는 벡터가 만들어지는 것을 볼 수 있다.

image

1
2
3
4
5
6
7
8
9
10
11
12
13
14
15
16
17
18
19
20
21
22
23
24
25
26
def get_angles(pos, i, d_model):
    """
    sin, cos 안에 들어갈 수치를 구하는 함수입니다.
    """
    angle_rates = 1 / np.power(10000, (2 * (i//2)) / np.float32(d_model))
    return pos * angle_rates


def positional_encoding(position, d_model):
    """
    위치 인코딩(Positional Encoding)을 구하는 함수입니다.
    
    """
    angle_rads = get_angles(np.arange(position)[:, np.newaxis],
                          np.arange(d_model)[np.newaxis, :],
                          d_model)

    # apply sin to even indices in the array; 2i
    angle_rads[:, 0::2] = np.sin(angle_rads[:, 0::2])

    # apply cos to odd indices in the array; 2i+1
    angle_rads[:, 1::2] = np.cos(angle_rads[:, 1::2])

    pos_encoding = angle_rads[np.newaxis, ...]

    return tf.cast(pos_encoding, dtype=tf.float32)

Self-Attention

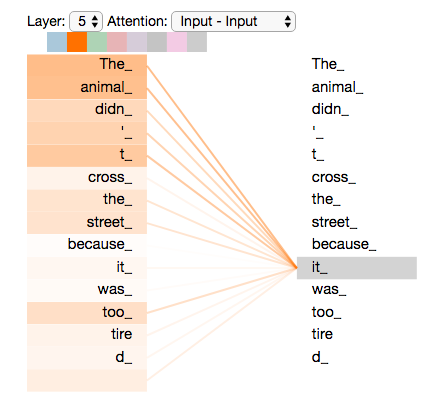
  • 제대로 번역하려면 지시 대명사가 어떤 대상을 가리키는지 알아야 한다.
  • 그렇기 때문에 트랜스포머에서는 번역하려는 문장 내부 요소의 관계를 잘 파악하기 위해서, 문장 자신에 대해 어텐션 메커니즘을 적용하는데, 이를 Self-Attention이라고 한다.
self_attention_visualization

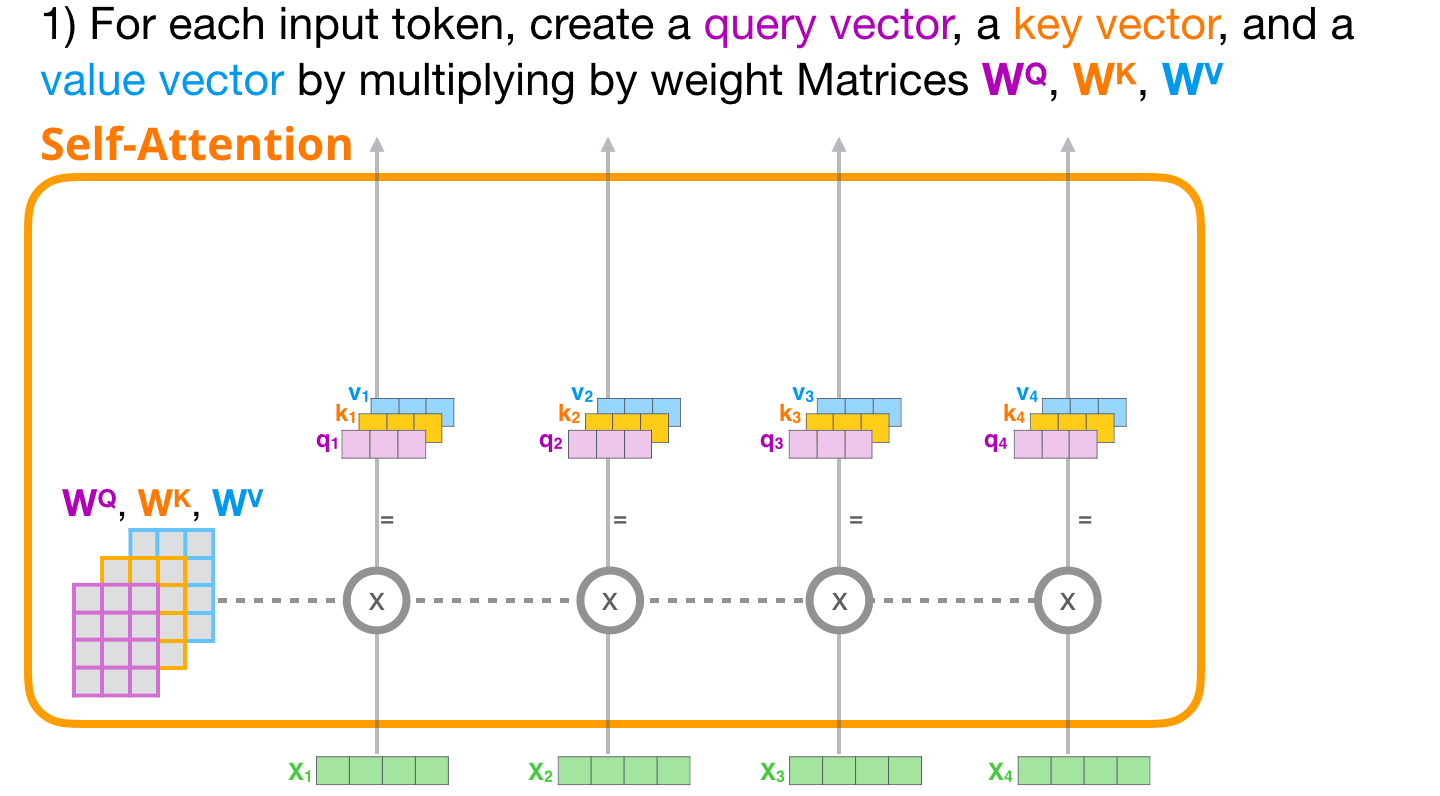
  • 기존 Attention과의 차이는 각 벡터가 모두 가중치 벡터라는 점이다.
    • q는 분석하고자 하는 단어에 대한 가중치 벡터이다.
    • k는 각 단어가 쿼리에 해당하는 단어와 얼마나 연관있는지 비교하기 위한 가중치 벡터이다.
    • v는 각 단어의 의미를 살려주기 위한 가중치 벡터이다.
  • Self-Attention은 세가지 가중치 벡터를 대상으로 어텐션을 적용한다.
  1. 특정 단어의 q 벡터와 모든 단어의 k 벡터를 내적한다. 내적을 통해 나오는 값이 Attention 스코어가 된다.
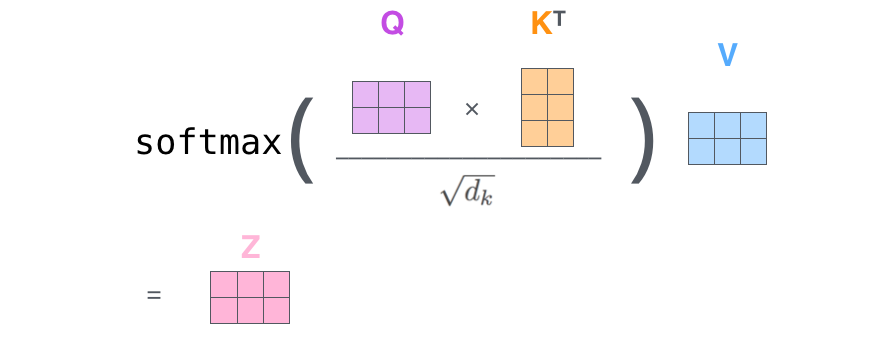
  2. 트랜스포머에서는 이 가중치를 q, k, v 벡터 차원 $d_k$ 의 제곱근인 $\sqrt{d_k}$로 나누어준다.(계산값을 안정적으로 만들어주기 위한 계산 보정)
  3. Softmax를 취해준다. 이를 통해 쿼리에 해당하는 단어와 문장 내 다른 단어가 가지는 관계의 비율을 구할 수 있다.
  4. 마지막으로 v 각 단어의 벡터를 곱해준 후 모두 더하면 Self-Attention 과정이 마무리된다.

Self-Attention 과정

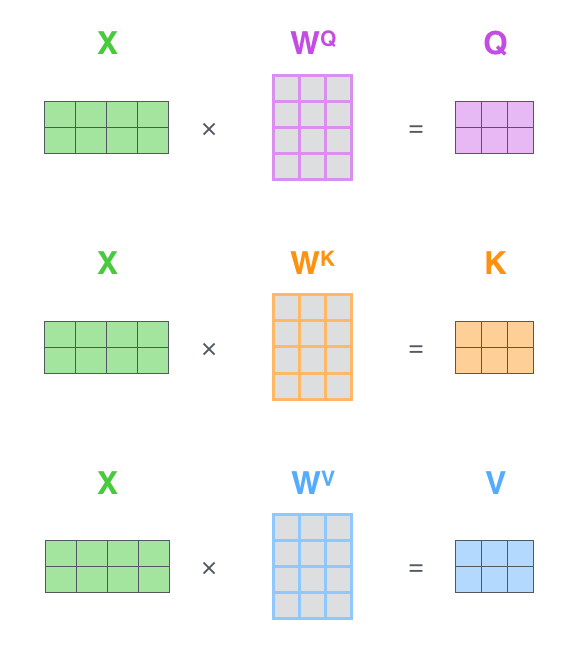
가중치 행렬 $W^Q, W^K, W^V$ 로부터 각 단어의 쿼리, 키, 밸류(q, k, v) 벡터를 만들어낸다.
transformer_15

분석하고자 하는 단어의 q 벡터와 문장 내 모든 단어의 k 벡터를 내적하여 각 단어와 관련 정도를 구한다.
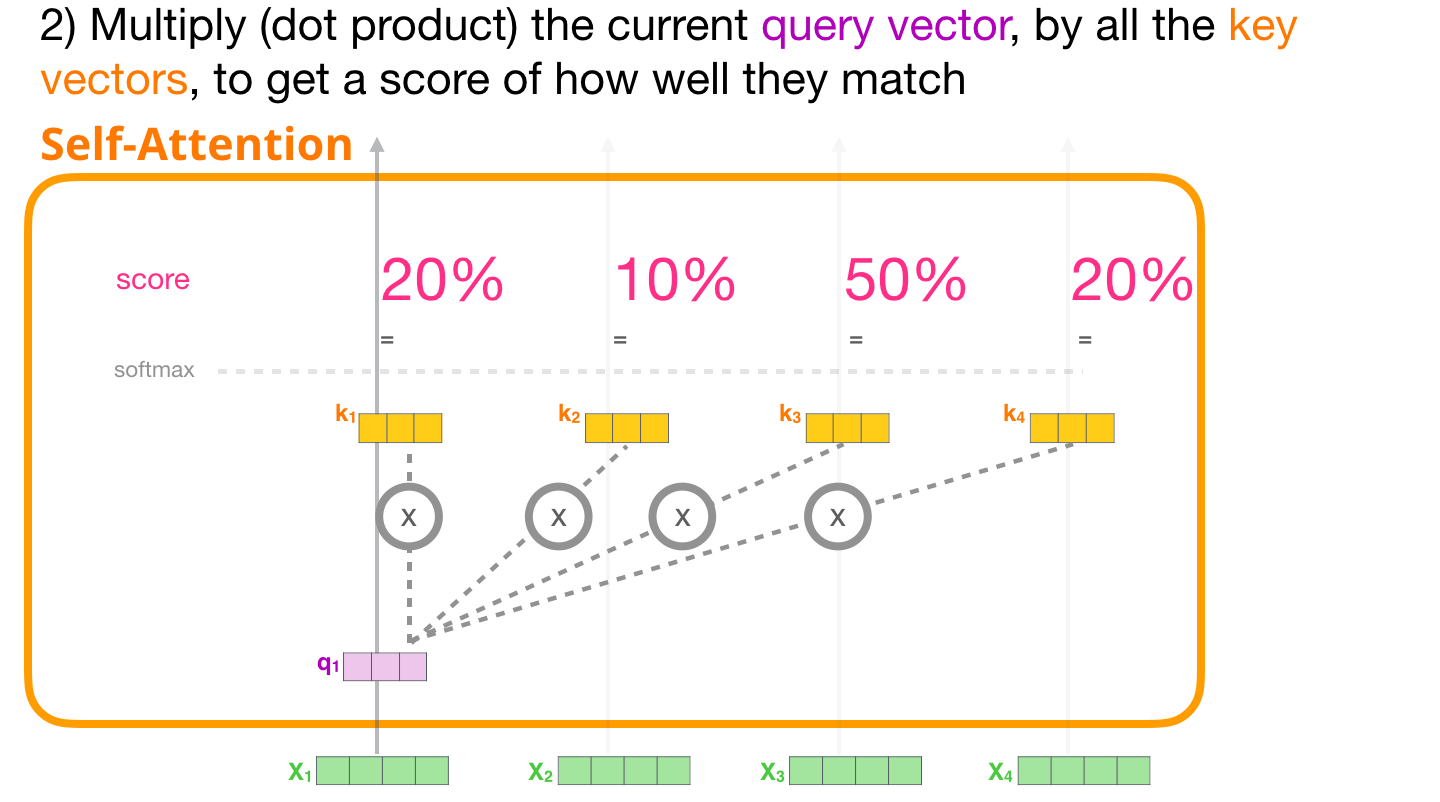
transformer_15

Softmax의 출력값과 v 벡터를 곱해준 뒤 더하면 해당 단어에 대한 Self-Attention 출력값을 얻을 수 있다.
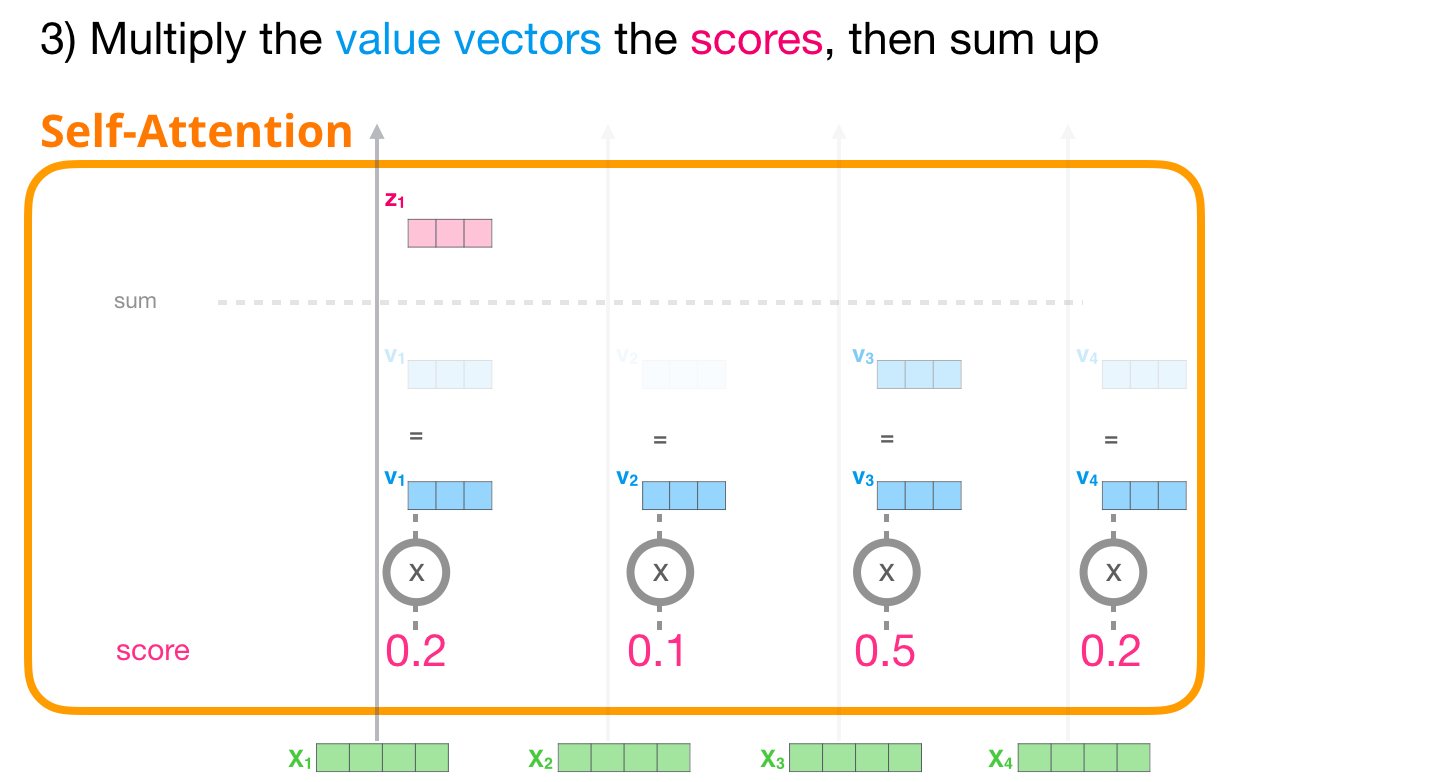
transformer_15

하나의 벡터에 대해서만 살펴봤지만 실제 Attention 계산은 행렬 단위로 병렬 계산된다.
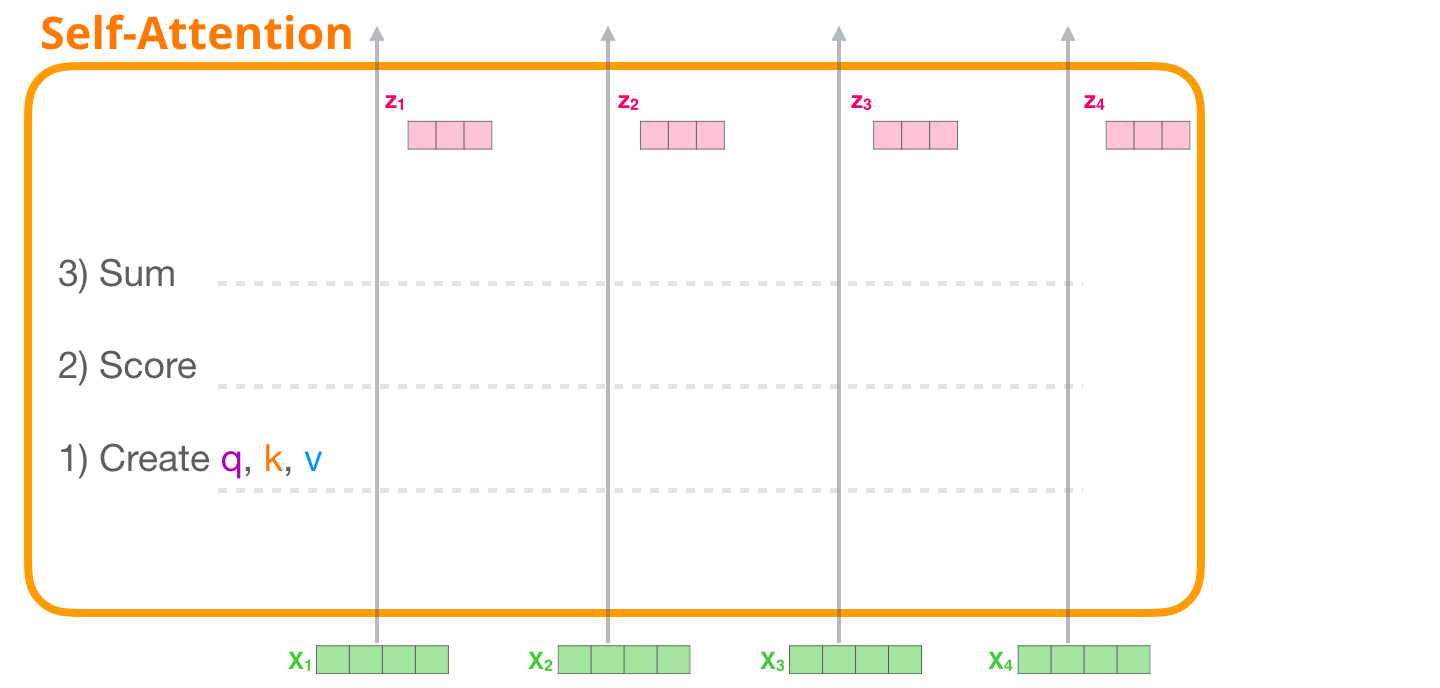
transformer_15

  • 실제로 각 벡터는 행렬(Q, K, V)로 한꺼번에 계산된다.
  • $W^Q, W^K, W^V$는 학습 과정에서 갱신되는 파라미터로 이루어진 행렬이다.
  • 세 행렬과 단어 행렬을 내적하여 Q, K, V를 만들어낸다.

transformer_12

  1. q 행렬과 k 행렬을 내적한다.
  2. 결과로 나오는 행렬의 요소를 $\sqrt{d_k}$로 나누어 준다.
  3. 행렬의 각 요소에 softmax를 취해준다.
  4. 마지막으로 v 행렬과 내적하면 최종 결과 z 행렬이 반환된다.

transformer_13

1
2
3
4
5
6
7
8
9
10
11
12
13
14
15
16
17
18
19
20
21
22
23
24
25
26
27
28
29
30
31
32
33
34
35
36
def scaled_dot_product_attention(q, k, v, mask):
    """
    Attention 가중치를 구하는 함수
    q, k, v 의 leading dimension은 동일해야 한다.
    k, v의 penultimate dimension이 동일해야 한다, i.e.: seq_len_k = seq_len_v.

    Mask는 타입(padding or look ahead)에 따라 다른 차원을 가질 수 있다.
    덧셈시에는 브로드캐스팅 될 수 있어야한다.
    
    Args:
        q: query shape == (..., seq_len_q, depth)
        k: key shape == (..., seq_len_k, depth)
        v: value shape == (..., seq_len_v, depth_v)
        mask: Float tensor with shape broadcastable 
            to (..., seq_len_q, seq_len_k). Defaults to None.
        
    Returns:
        output, attention_weights
    """

    matmul_qk = tf.matmul(q, k, transpose_b=True)  # (..., seq_len_q, seq_len_k)
    
    # matmul_qk(쿼리와 키의 내적)을 dk의 제곱근으로 scaling
    dk = tf.cast(tf.shape(k)[-1], tf.float32)
    scaled_attention_logits = matmul_qk / tf.math.sqrt(dk)

    # 마스킹을 진행합니다.
    if mask is not None:
        scaled_attention_logits += (mask * -1e9)  

    # 소프트맥스(softmax) 함수를 통해서 attention weight
    attention_weights = tf.nn.softmax(scaled_attention_logits, axis=-1)  # (..., seq_len_q, seq_len_k)

    output = tf.matmul(attention_weights, v)  # (..., seq_len_q, depth_v)

    return output, attention_weights

Multi-Head Attention

  • Self-Attention을 동시에 병렬적으로 실행하는 것이다.
  • 각 Head 마다 다른 Attention 결과를 내어주기 때문에 앙상블과 유사한 효과를 얻을 수 있다.
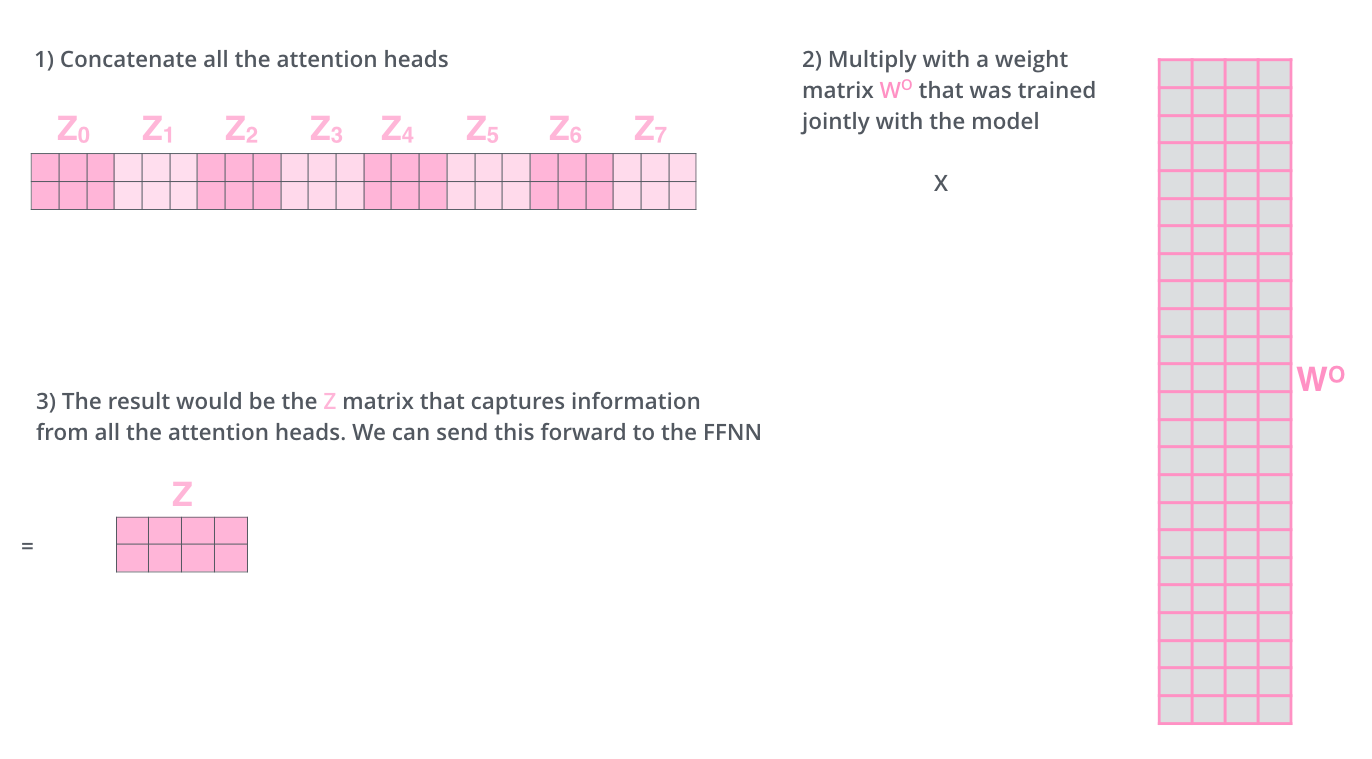
  • 8번의 Self-Attention을 실행하여 각각의 출력 행렬 $Z_0, Z_1, \cdots , Z_7$을 만든다.
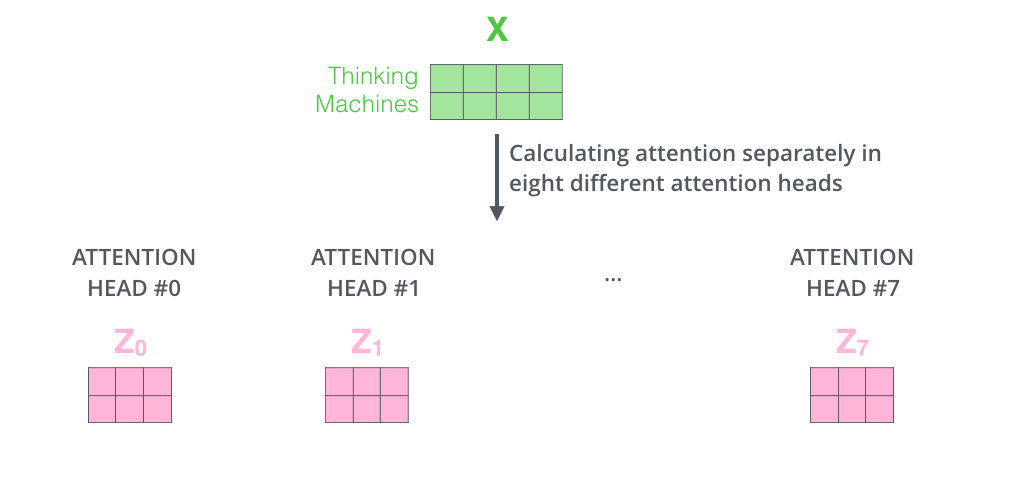
transformer_16

  • 출력된 행렬 $Z_n (n=0,\cdots,7)$은 이어붙여진다(Concatenate).
  • 또 다른 파라미터 행렬인 $W^0$와의 내적을 통해 Multi-Head Attention의 최종결과인 행렬 $Z$를 만들어낸다.
  • 여기서 행렬 $W^0$의 요소 역시 학습을 통해 갱신된다.
  • 최종적으로 생성된 행렬 $Z$는 토큰 벡터로 이루어진 행렬 $X$와 동일한 크기(Shape)가 된다.
transformer_17

Layer Normalization & Skip Connection

  • 트랜스포머의 모든 sub-layer에서 출력된 벡터는 Layer normalization과 Skip connection을 거치게 된다.
  • Layer normalization의 효과는 Batch normalization과 유사하다.
  • 학습이 빠르고 잘 되도록 한다.
  • Skip connection은 역전파 과정에서 정보가 소실되지 않도록 한다.

Feed Foward Neural Network

  • 은닉층의 차원이 늘어났다가 다시 원래 차원으로 줄어드는 단순한 2층 신경망이다.
  • 활성화 함수로 ReLU를 사용한다.
\[\text{FFNN}(x) = \max(0, W_1x + b_1) W_2 +b_2\]
1
2
3
4
5
6
7
8
9
10
11
12
def point_wise_feed_forward_network(d_model, dff):
    """
    FFNN을 구현한 코드

    Args:
        d_model : 모델의 차원입니다.
        dff : 은닉층의 차원 수입니다. 논문에서는 2048을 사용하였습니다.
    """
    return tf.keras.Sequential([
        tf.keras.layers.Dense(dff, activation='relu'),  # (batch_size, seq_len, dff)
        tf.keras.layers.Dense(d_model)  # (batch_size, seq_len, d_model)
    ])

Masked Self-Attention

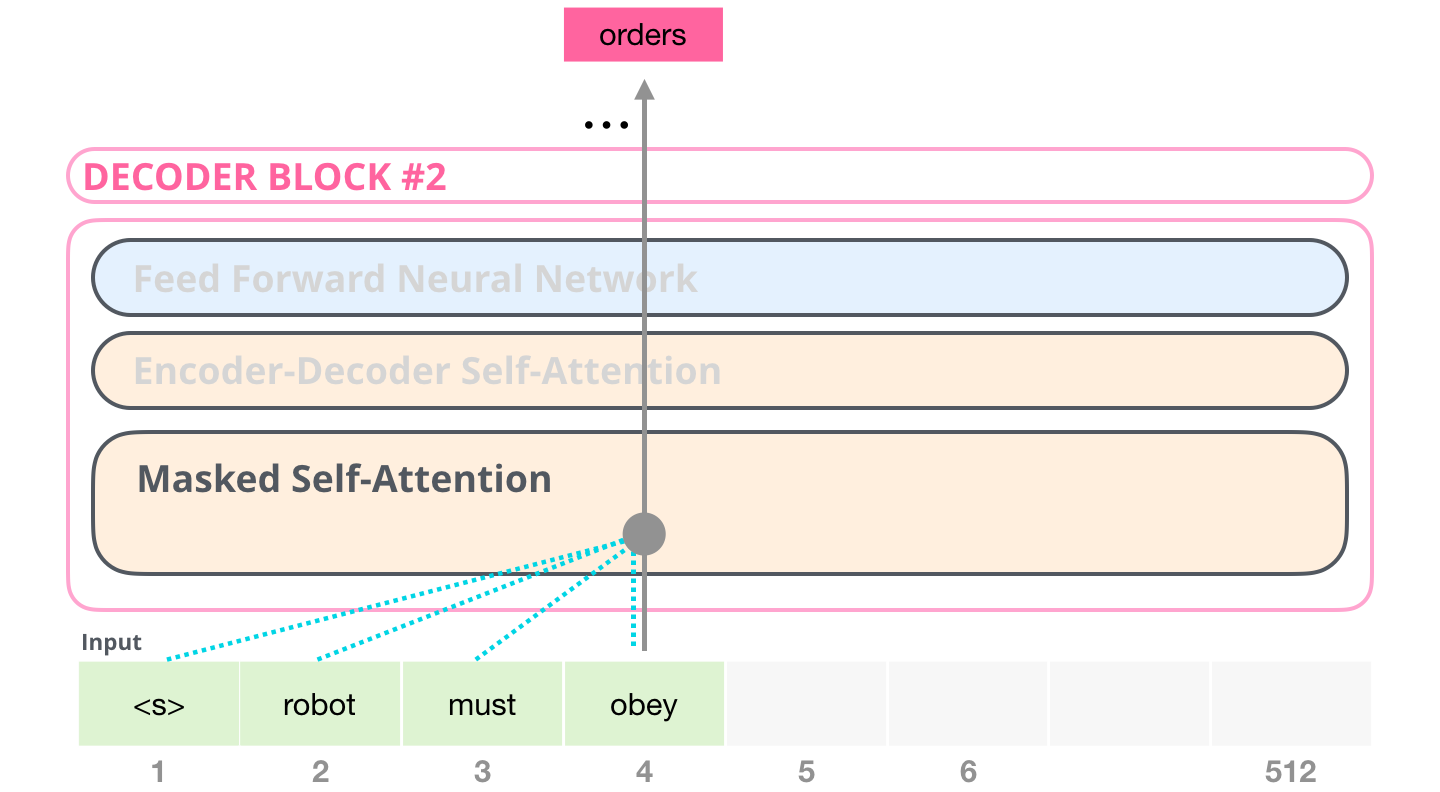
  • 디코더 블록에서 사용되는 특수한 Self-Attention이다.
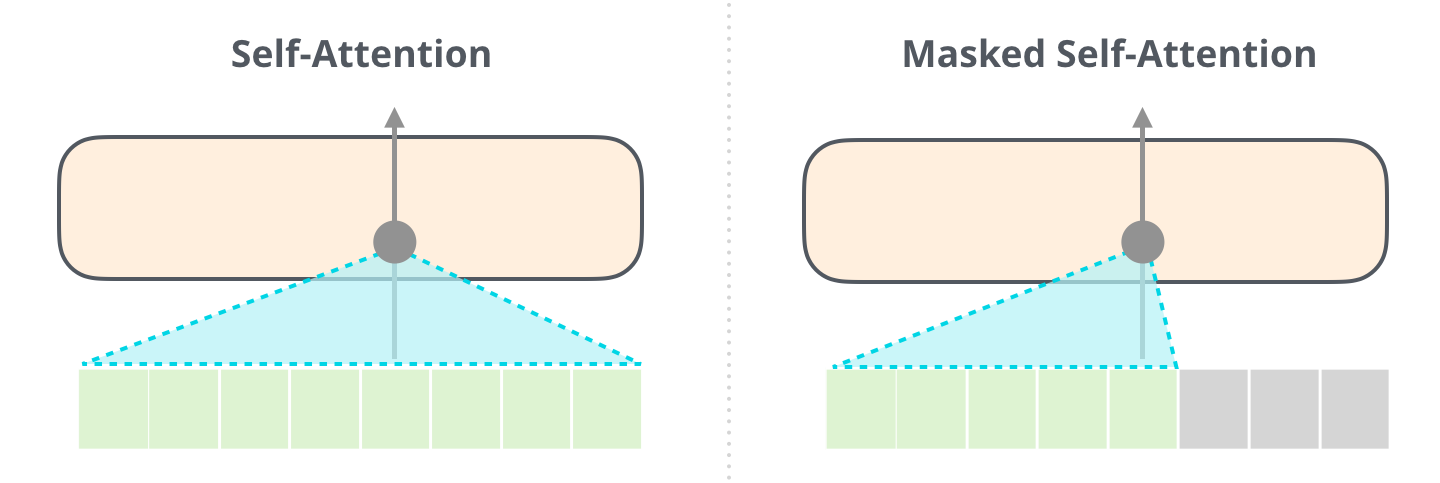
  • 디코더는 Auto-Regressive(왼쪽 단어를 보고 오른쪽 단어를 예측)하게 단어를 생성하기 때문에 타깃 단어 이후 단어를 보지 않고 단어를 예측해야 한다.
  • 따라서 타깃 단어 뒤에 위치한 단어는 Self Attention에 영향을 주지 않도록 마스킹(masking)을 해주어야 한다.
Masked_Self-Attention_ex

Self-Attention (without Masking) vs Masked Self-Attention
Masked_Self-Attention_ex2

  • Softmax를 취해주기 전, 가려주고자 하는 요소에만 $-\infty$에 해당하는 매우 작은 수를 더해준다.
  • 이 과정을 마스킹(masking)이라고 하며, 마스킹된 값은 Softmax를 취해 주었을 때 0이 나오므로 Value 계산에 반영되지 않는다.

masked_1

masked_2

1
2
3
4
5
6
7
8
9
10
11
12
13
14
15
16
17
18
19
20
21
22
23
24
25
26
27
28
29
30
31
32
33
34
35
36
37
38
39
40
41
def scaled_dot_product_attention(q, k, v, mask):
    """
    Attention 가중치를 구하는 함수
    q, k, v 의 leading dimension은 동일해야 한다.
    k, v의 penultimate dimension이 동일해야 한다, i.e.: seq_len_k = seq_len_v.

    Mask는 타입(padding or look ahead)에 따라 다른 차원을 가질 수 있다.
    덧셈시에는 브로드캐스팅 될 수 있어야한다.
    
    Args:
        q: query shape == (..., seq_len_q, depth)
        k: key shape == (..., seq_len_k, depth)
        v: value shape == (..., seq_len_v, depth_v)
        mask: Float tensor with shape broadcastable 
            to (..., seq_len_q, seq_len_k). Defaults to None.
        
    Returns:
        output, attention_weights
    """

    matmul_qk = tf.matmul(q, k, transpose_b=True)  # (..., seq_len_q, seq_len_k)
    
    # matmul_qk(쿼리와 키의 내적)을 dk의 제곱근으로 scaling
    dk = tf.cast(tf.shape(k)[-1], tf.float32)
    scaled_attention_logits = matmul_qk / tf.math.sqrt(dk)

    """
    mask가 있을 경우 masking된 자리(mask=1)에는 (-inf)에 해당하는 절댓값이 큰 음수 -1e9(=-10억)을 더해준다.
    그 값에 softmax를 취해주면 거의 0에 가까운 값이 나온다. 그 다음 value 계산시에 반영되지 않는다.
    """

    # 마스킹 진행
    if mask is not None:
        scaled_attention_logits += (mask * -1e9)  

    # 소프트맥스(softmax) 함수를 통해서 attention weight 를 구한다.
    attention_weights = tf.nn.softmax(scaled_attention_logits, axis=-1)  # (..., seq_len_q, seq_len_k)

    output = tf.matmul(attention_weights, v)  # (..., seq_len_q, depth_v)

    return output, attention_weights

Encoder-Decoder Attention

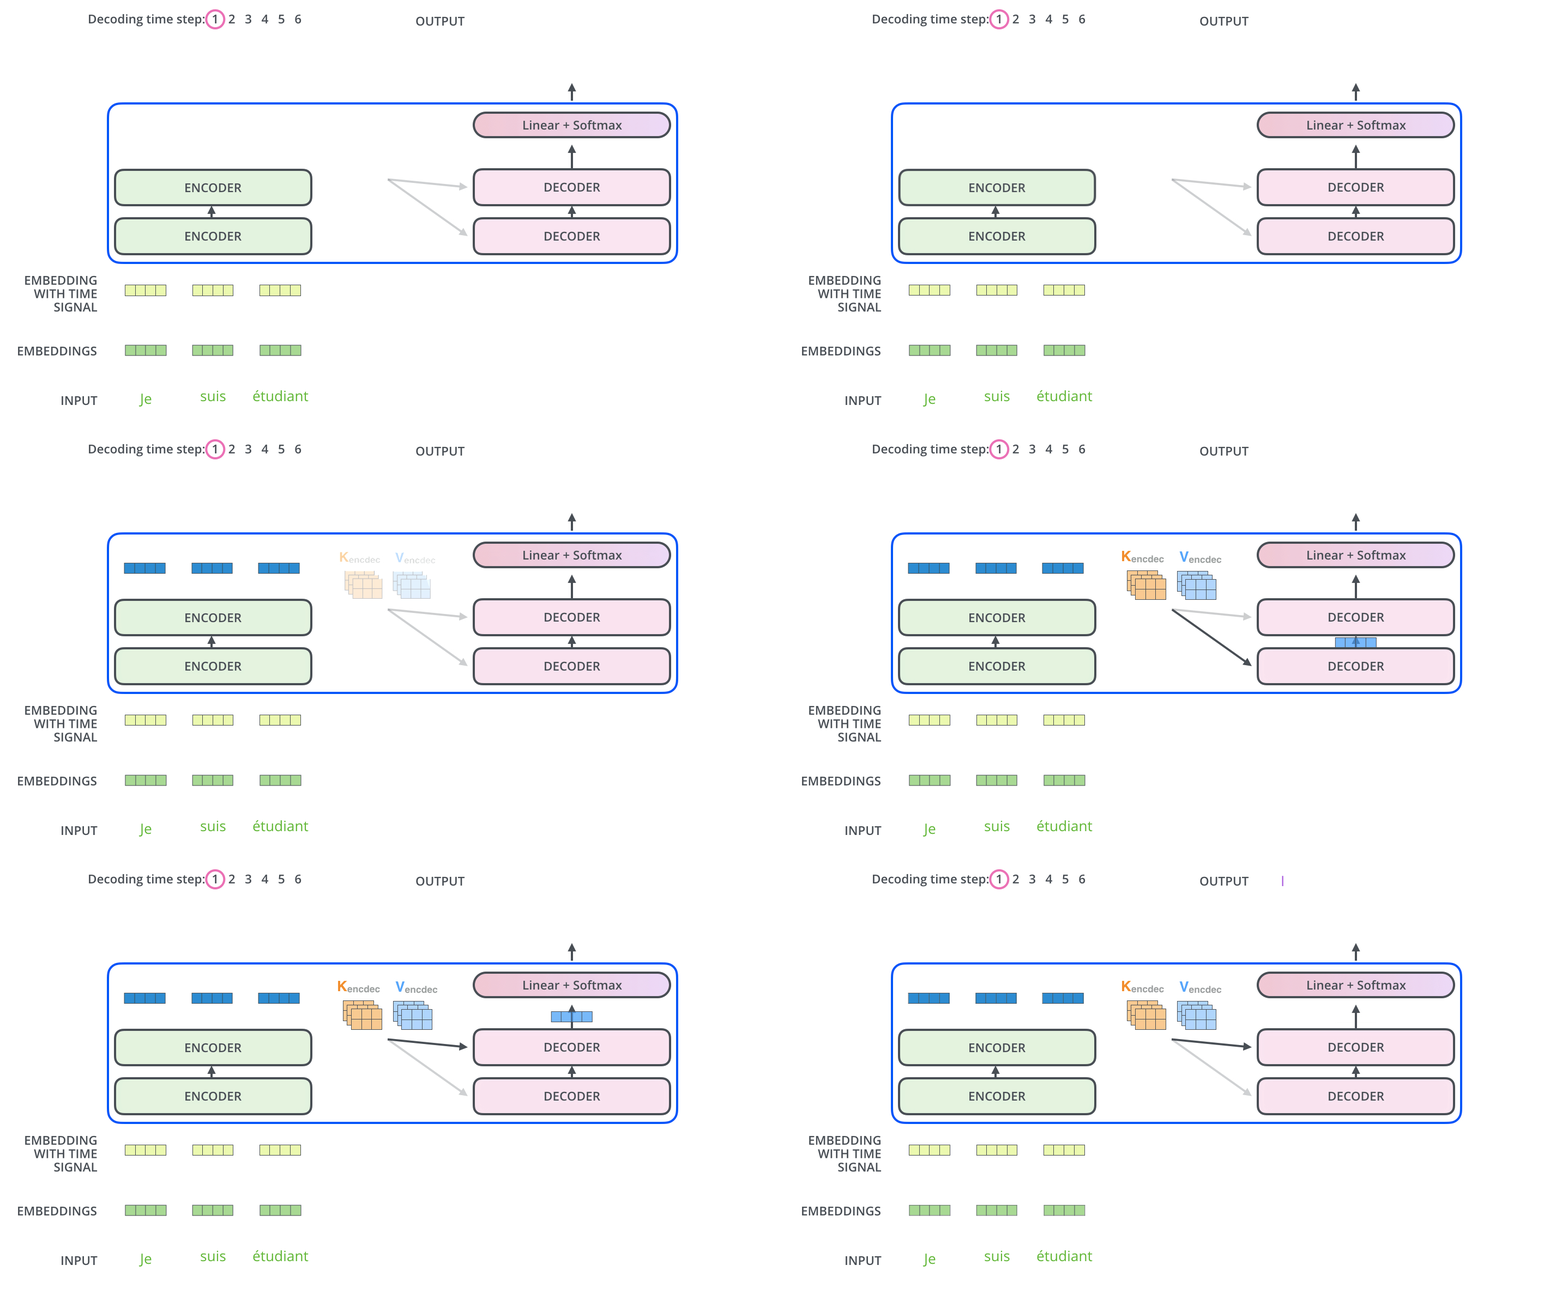
  • 디코더에서 Masked Self-Attention 층을 지난 벡터는 Encoder-Decoder Attention 층으로 들어간다.
  • 좋은 번역을 위해서는 번역할 문장과 번역된 문장 간의 관계 역시 중요하다.
  • 번역할 문장과 번역되는 문장의 정보 관계를 엮어주는 부분이 이 부분이다.
  • 이 층에서는 디코더 블록의 Masked Self-Attention으로부터 출력된 벡터를 Q 벡터로 사용한다.
  • K와 V 벡터는 최상위(6번째) 인코더 블록에서 사용했던 값을 그대로 가져와서 사용한다.
  • 계산과정은 Self-Attention과 동일하다.

Encoder-Decoder_Attention_gif

Linear & Softmax Layer

  • 디코더 최상층을 통과한 벡터는 Linear 층을 지난 후 Softmax를 통해 에측할 단어의 확률을 구하게 된다.

코드 실습

1
2
3
4
5
6
7
8
9
10
11
12
13
14
15
16
17
18
19
20
21
22
23
24
25
26
27
28
29
30
31
32
33
34
35
36
37
38
39
40
41
42
43
44
45
46
47
48
49
50
51
52
53
54
55
56
57
58
59
60
61
62
63
64
65
66
67
68
69
70
71
72
73
74
75
76
77
78
79
80
81
82
83
84
85
86
87
88
89
90
91
92
93
94
95
96
97
98
99
100
101
102
103
104
105
106
107
108
109
110
111
112
113
114
115
116
117
118
119
120
121
122
123
124
125
126
127
128
129
130
131
132
133
134
135
136
137
138
139
140
141
142
143
144
145
146
147
148
149
150
151
152
153
154
155
156
157
158
159
160
161
162
163
164
165
166
167
168
169
170
171
172
173
174
175
176
177
178
179
180
181
182
183
184
185
186
187
188
189
190
191
192
193
194
195
196
197
198
199
200
201
202
203
204
205
206
207
208
209
210
211
212
213
214
215
216
217
218
219
220
221
222
223
224
225
226
227
228
229
230
231
232
233
234
235
236
237
238
239
240
241
242
243
244
245
246
247
248
249
250
251
252
253
254
255
256
257
258
259
260
261
262
263
264
265
266
267
268
269
270
271
272
273
274
275
276
277
278
279
280
281
282
283
284
285
286
287
288
289
290
291
292
293
294
295
296
297
298
299
300
301
302
303
304
305
306
307
308
309
310
311
312
313
314
315
316
317
318
319
320
321
322
323
324
325
326
327
328
329
330
331
332
333
334
335
336
337
338
339
340
341
342
343
344
345
346
347
348
349
350
351
352
353
354
355
356
357
358
359
360
361
362
363
364
365
366
367
368
369
370
371
372
373
374
375
376
377
378
379
380
381
382
383
384
385
386
387
388
389
390
391
392
393
394
395
396
397
398
399
400
401
402
403
404
405
406
407
408
409
410
411
412
import pathlib
import random
import string
import re
import numpy as np
import tensorflow as tf
from tensorflow import keras
from tensorflow.keras import layers
from keras.layers.experimental.preprocessing import TextVectorization


# 스페인어 영어 말뭉치 import
text_file = keras.utils.get_file(
    fname="spa-eng.zip",
    origin="http://storage.googleapis.com/download.tensorflow.org/data/spa-eng.zip",
    extract=True,
)
text_file = pathlib.Path(text_file).parent / "spa-eng" / "spa.txt"
'''
Downloading data from http://storage.googleapis.com/download.tensorflow.org/data/spa-eng.zip
2646016/2638744 [==============================] - 0s 0us/step
'''


# 전처리
with open(text_file) as f:
    lines = f.read().split("\n")[:-1]
text_pairs = []
for line in lines:
    eng, spa = line.split("\t")
    spa = "[start] " + spa + " [end]"
    text_pairs.append((eng, spa))

for _ in range(5):
    print(random.choice(text_pairs))
'''
('You deserve a medal.', '[start] Te mereces una medalla. [end]')
("Tom doesn't owe me anything.", '[start] Tom no me debe nada. [end]')
('I asked the boy to throw the ball back.', '[start] Le pedí al niño que me devolviera la pelota. [end]')
('I drank from the tap.', '[start] He bebido del grifo. [end]')
('Tom paid way too much for that old car.', '[start] Tom pagó demasiado por este carro viejo. [end]')
'''


# split
random.shuffle(text_pairs)
num_val_samples = int(0.15 * len(text_pairs))
num_train_samples = len(text_pairs) - 2 * num_val_samples
train_pairs = text_pairs[:num_train_samples]
val_pairs = text_pairs[num_train_samples : num_train_samples + num_val_samples]
test_pairs = text_pairs[num_train_samples + num_val_samples :]

print(f"{len(text_pairs)} total pairs")
print(f"{len(train_pairs)} training pairs")
print(f"{len(val_pairs)} validation pairs")
print(f"{len(test_pairs)} test pairs")
'''
118964 total pairs
83276 training pairs
17844 validation pairs
17844 test pairs
'''


strip_chars = string.punctuation + "¿"
strip_chars = strip_chars.replace("[", "")
strip_chars = strip_chars.replace("]", "")

vocab_size = 15000
sequence_length = 20
batch_size = 64


def custom_standardization(input_string):
    lowercase = tf.strings.lower(input_string)
    return tf.strings.regex_replace(lowercase, "[%s]" % re.escape(strip_chars), "")


eng_vectorization = TextVectorization(
    max_tokens=vocab_size, output_mode="int", output_sequence_length=sequence_length,
)
spa_vectorization = TextVectorization(
    max_tokens=vocab_size,
    output_mode="int",
    output_sequence_length=sequence_length + 1,
    standardize=custom_standardization,
)
train_eng_texts = [pair[0] for pair in train_pairs]
train_spa_texts = [pair[1] for pair in train_pairs]
eng_vectorization.adapt(train_eng_texts)
spa_vectorization.adapt(train_spa_texts)


def format_dataset(eng, spa):
    eng = eng_vectorization(eng)
    spa = spa_vectorization(spa)
    return ({"encoder_inputs": eng, "decoder_inputs": spa[:, :-1],}, spa[:, 1:])


def make_dataset(pairs):
    eng_texts, spa_texts = zip(*pairs)
    eng_texts = list(eng_texts)
    spa_texts = list(spa_texts)
    dataset = tf.data.Dataset.from_tensor_slices((eng_texts, spa_texts))
    dataset = dataset.batch(batch_size)
    dataset = dataset.map(format_dataset)
    return dataset.shuffle(2048).prefetch(16).cache()


train_ds = make_dataset(train_pairs)
val_ds = make_dataset(val_pairs)


for inputs, targets in train_ds.take(1):
    print(f'inputs["encoder_inputs"].shape: {inputs["encoder_inputs"].shape}')
    print(f'inputs["decoder_inputs"].shape: {inputs["decoder_inputs"].shape}')
    print(f"targets.shape: {targets.shape}")
'''
inputs["encoder_inputs"].shape: (64, 20)
inputs["decoder_inputs"].shape: (64, 20)
targets.shape: (64, 20)
'''


class TransformerEncoder(layers.Layer):
    def __init__(self, embed_dim, dense_dim, num_heads, **kwargs):
        super(TransformerEncoder, self).__init__(**kwargs)
        self.embed_dim = embed_dim
        self.dense_dim = dense_dim
        self.num_heads = num_heads
        self.attention = layers.MultiHeadAttention(
            num_heads=num_heads, key_dim=embed_dim
        )
        self.dense_proj = keras.Sequential(
            [layers.Dense(dense_dim, activation="relu"), layers.Dense(embed_dim),]
        )
        self.layernorm_1 = layers.LayerNormalization()
        self.layernorm_2 = layers.LayerNormalization()
        self.supports_masking = True

    def call(self, inputs, mask=None):
        if mask is not None:
            padding_mask = tf.cast(mask[:, tf.newaxis, tf.newaxis, :], dtype="int32")
        attention_output = self.attention(
            query=inputs, value=inputs, key=inputs, attention_mask=padding_mask
        )
        proj_input = self.layernorm_1(inputs + attention_output)
        proj_output = self.dense_proj(proj_input)
        return self.layernorm_2(proj_input + proj_output)


class PositionalEmbedding(layers.Layer):
    def __init__(self, sequence_length, vocab_size, embed_dim, **kwargs):
        super(PositionalEmbedding, self).__init__(**kwargs)
        self.token_embeddings = layers.Embedding(
            input_dim=vocab_size, output_dim=embed_dim
        )
        self.position_embeddings = layers.Embedding(
            input_dim=sequence_length, output_dim=embed_dim
        )
        self.sequence_length = sequence_length
        self.vocab_size = vocab_size
        self.embed_dim = embed_dim

    def call(self, inputs):
        length = tf.shape(inputs)[-1]
        positions = tf.range(start=0, limit=length, delta=1)
        embedded_tokens = self.token_embeddings(inputs)
        embedded_positions = self.position_embeddings(positions)
        return embedded_tokens + embedded_positions

    def compute_mask(self, inputs, mask=None):
        return tf.math.not_equal(inputs, 0)


class TransformerDecoder(layers.Layer):
    def __init__(self, embed_dim, latent_dim, num_heads, **kwargs):
        super(TransformerDecoder, self).__init__(**kwargs)
        self.embed_dim = embed_dim
        self.latent_dim = latent_dim
        self.num_heads = num_heads
        self.attention_1 = layers.MultiHeadAttention(
            num_heads=num_heads, key_dim=embed_dim
        )
        self.attention_2 = layers.MultiHeadAttention(
            num_heads=num_heads, key_dim=embed_dim
        )
        self.dense_proj = keras.Sequential(
            [layers.Dense(latent_dim, activation="relu"), layers.Dense(embed_dim),]
        )
        self.layernorm_1 = layers.LayerNormalization()
        self.layernorm_2 = layers.LayerNormalization()
        self.layernorm_3 = layers.LayerNormalization()
        self.supports_masking = True

    def call(self, inputs, encoder_outputs, mask=None):
        causal_mask = self.get_causal_attention_mask(inputs)
        if mask is not None:
            padding_mask = tf.cast(mask[:, tf.newaxis, :], dtype="int32")
            padding_mask = tf.minimum(padding_mask, causal_mask)

        attention_output_1 = self.attention_1(
            query=inputs, value=inputs, key=inputs, attention_mask=causal_mask
        )
        out_1 = self.layernorm_1(inputs + attention_output_1)

        attention_output_2 = self.attention_2(
            query=out_1,
            value=encoder_outputs,
            key=encoder_outputs,
            attention_mask=padding_mask,
        )
        out_2 = self.layernorm_2(out_1 + attention_output_2)

        proj_output = self.dense_proj(out_2)
        return self.layernorm_3(out_2 + proj_output)

    def get_causal_attention_mask(self, inputs):
        input_shape = tf.shape(inputs)
        batch_size, sequence_length = input_shape[0], input_shape[1]
        i = tf.range(sequence_length)[:, tf.newaxis]
        j = tf.range(sequence_length)
        mask = tf.cast(i >= j, dtype="int32")
        mask = tf.reshape(mask, (1, input_shape[1], input_shape[1]))
        mult = tf.concat(
            [tf.expand_dims(batch_size, -1), tf.constant([1, 1], dtype=tf.int32)],
            axis=0,
        )
        return tf.tile(mask, mult)


embed_dim = 256
latent_dim = 2048
num_heads = 8

encoder_inputs = keras.Input(shape=(None,), dtype="int64", name="encoder_inputs")
x = PositionalEmbedding(sequence_length, vocab_size, embed_dim)(encoder_inputs)
encoder_outputs = TransformerEncoder(embed_dim, latent_dim, num_heads)(x)
encoder = keras.Model(encoder_inputs, encoder_outputs)

decoder_inputs = keras.Input(shape=(None,), dtype="int64", name="decoder_inputs")
encoded_seq_inputs = keras.Input(shape=(None, embed_dim), name="decoder_state_inputs")
x = PositionalEmbedding(sequence_length, vocab_size, embed_dim)(decoder_inputs)
x = TransformerDecoder(embed_dim, latent_dim, num_heads)(x, encoded_seq_inputs)
x = layers.Dropout(0.5)(x)
decoder_outputs = layers.Dense(vocab_size, activation="softmax")(x)
decoder = keras.Model([decoder_inputs, encoded_seq_inputs], decoder_outputs)

decoder_outputs = decoder([decoder_inputs, encoder_outputs])
transformer = keras.Model(
    [encoder_inputs, decoder_inputs], decoder_outputs, name="transformer"
)


epochs = 30  # This should be at least 30 for convergence

transformer.summary()
transformer.compile(
    "rmsprop", loss="sparse_categorical_crossentropy", metrics=["accuracy"]
)
transformer.fit(train_ds, epochs=epochs, validation_data=val_ds)
'''
Model: "transformer"
__________________________________________________________________________________________________
Layer (type)                    Output Shape         Param #     Connected to                     
==================================================================================================
encoder_inputs (InputLayer)     [(None, None)]       0                                            
__________________________________________________________________________________________________
positional_embedding (Positiona (None, None, 256)    3845120     encoder_inputs[0][0]             
__________________________________________________________________________________________________
decoder_inputs (InputLayer)     [(None, None)]       0                                            
__________________________________________________________________________________________________
transformer_encoder (Transforme (None, None, 256)    3155456     positional_embedding[0][0]       
__________________________________________________________________________________________________
model_1 (Functional)            (None, None, 15000)  12959640    decoder_inputs[0][0]             
                                                                 transformer_encoder[0][0]        
==================================================================================================
Total params: 19,960,216
Trainable params: 19,960,216
Non-trainable params: 0
__________________________________________________________________________________________________
Epoch 1/30
1302/1302 [==============================] - 190s 143ms/step - loss: 0.9396 - accuracy: 0.6980 - val_loss: 1.0049 - val_accuracy: 0.6563
Epoch 2/30
1302/1302 [==============================] - 185s 142ms/step - loss: 0.9190 - accuracy: 0.7064 - val_loss: 1.0081 - val_accuracy: 0.6586
Epoch 3/30
1302/1302 [==============================] - 185s 142ms/step - loss: 0.9073 - accuracy: 0.7113 - val_loss: 1.0071 - val_accuracy: 0.6586
Epoch 4/30
1302/1302 [==============================] - 186s 143ms/step - loss: 0.8950 - accuracy: 0.7165 - val_loss: 1.0124 - val_accuracy: 0.6615
Epoch 5/30
1302/1302 [==============================] - 186s 143ms/step - loss: 0.8838 - accuracy: 0.7215 - val_loss: 1.0151 - val_accuracy: 0.6579
Epoch 6/30
1302/1302 [==============================] - 185s 142ms/step - loss: 0.8734 - accuracy: 0.7259 - val_loss: 1.0134 - val_accuracy: 0.6610
Epoch 7/30
1302/1302 [==============================] - 185s 142ms/step - loss: 0.8634 - accuracy: 0.7296 - val_loss: 1.0161 - val_accuracy: 0.6626
Epoch 8/30
1302/1302 [==============================] - 185s 142ms/step - loss: 0.8523 - accuracy: 0.7339 - val_loss: 1.0164 - val_accuracy: 0.6641
Epoch 9/30
1302/1302 [==============================] - 185s 142ms/step - loss: 0.8434 - accuracy: 0.7374 - val_loss: 1.0281 - val_accuracy: 0.6624
Epoch 10/30
1302/1302 [==============================] - 185s 142ms/step - loss: 0.8341 - accuracy: 0.7410 - val_loss: 1.0312 - val_accuracy: 0.6616
Epoch 11/30
1302/1302 [==============================] - 184s 141ms/step - loss: 0.8244 - accuracy: 0.7445 - val_loss: 1.0317 - val_accuracy: 0.6651
Epoch 12/30
1302/1302 [==============================] - 185s 142ms/step - loss: 0.8171 - accuracy: 0.7476 - val_loss: 1.0406 - val_accuracy: 0.6653
Epoch 13/30
1302/1302 [==============================] - 185s 142ms/step - loss: 0.8091 - accuracy: 0.7504 - val_loss: 1.0365 - val_accuracy: 0.6632
Epoch 14/30
 187/1302 [===>..........................] - ETA: 2:27 - loss: 0.7954 - accuracy: 0.7554
'''


spa_vocab = spa_vectorization.get_vocabulary()
spa_index_lookup = dict(zip(range(len(spa_vocab)), spa_vocab))
max_decoded_sentence_length = 20


def decode_sequence(input_sentence):
    tokenized_input_sentence = eng_vectorization([input_sentence])
    decoded_sentence = "[start]"
    for i in range(max_decoded_sentence_length):
        tokenized_target_sentence = spa_vectorization([decoded_sentence])[:, :-1]
        predictions = transformer([tokenized_input_sentence, tokenized_target_sentence])

        sampled_token_index = np.argmax(predictions[0, i, :])
        sampled_token = spa_index_lookup[sampled_token_index]
        decoded_sentence += " " + sampled_token

        if sampled_token == "[end]":
            break
    return decoded_sentence


test_eng_texts = [pair[0] for pair in test_pairs]
for _ in range(30):
    input_sentence = random.choice(test_eng_texts)
    translated = decode_sequence(input_sentence)


# 코드 실습 2
import tensorflow as tf
from tensorflow import keras
from tensorflow.keras import layers


class TransformerBlock(layers.Layer):
    def __init__(self, embed_dim, num_heads, ff_dim, rate=0.1):
        super(TransformerBlock, self).__init__()
        self.att = layers.MultiHeadAttention(num_heads=num_heads, key_dim=embed_dim)
        self.ffn = keras.Sequential(
            [layers.Dense(ff_dim, activation="relu"), layers.Dense(embed_dim),]
        )
        self.layernorm1 = layers.LayerNormalization(epsilon=1e-6)
        self.layernorm2 = layers.LayerNormalization(epsilon=1e-6)
        self.dropout1 = layers.Dropout(rate)
        self.dropout2 = layers.Dropout(rate)

    def call(self, inputs, training):
        attn_output = self.att(inputs, inputs)
        attn_output = self.dropout1(attn_output, training=training)
        out1 = self.layernorm1(inputs + attn_output)
        ffn_output = self.ffn(out1)
        ffn_output = self.dropout2(ffn_output, training=training)
        return self.layernorm2(out1 + ffn_output)


class TokenAndPositionEmbedding(layers.Layer):
    def __init__(self, maxlen, vocab_size, embed_dim):
        super(TokenAndPositionEmbedding, self).__init__()
        self.token_emb = layers.Embedding(input_dim=vocab_size, output_dim=embed_dim)
        self.pos_emb = layers.Embedding(input_dim=maxlen, output_dim=embed_dim)

    def call(self, x):
        maxlen = tf.shape(x)[-1]
        positions = tf.range(start=0, limit=maxlen, delta=1)
        positions = self.pos_emb(positions)
        x = self.token_emb(x)
        return x + positions


vocab_size = 20000  # Only consider the top 20k words
maxlen = 200  # Only consider the first 200 words of each movie review
(x_train, y_train), (x_val, y_val) = keras.datasets.imdb.load_data(num_words=vocab_size)
print(len(x_train), "Training sequences")
print(len(x_val), "Validation sequences")
x_train = keras.preprocessing.sequence.pad_sequences(x_train, maxlen=maxlen)
x_val = keras.preprocessing.sequence.pad_sequences(x_val, maxlen=maxlen)


embed_dim = 32  # Embedding size for each token
num_heads = 2  # Number of attention heads
ff_dim = 32  # Hidden layer size in feed forward network inside transformer

inputs = layers.Input(shape=(maxlen,))
embedding_layer = TokenAndPositionEmbedding(maxlen, vocab_size, embed_dim)
x = embedding_layer(inputs)
transformer_block = TransformerBlock(embed_dim, num_heads, ff_dim)
x = transformer_block(x)
x = layers.GlobalAveragePooling1D()(x)
x = layers.Dropout(0.1)(x)
x = layers.Dense(20, activation="relu")(x)
x = layers.Dropout(0.1)(x)
outputs = layers.Dense(2, activation="softmax")(x)

model = keras.Model(inputs=inputs, outputs=outputs)


model.compile("adam", "sparse_categorical_crossentropy", metrics=["accuracy"])
history = model.fit(
    x_train, y_train, batch_size=32, epochs=2, validation_data=(x_val, y_val)
)

GPT, BERT

  • 트랜스포머 구조를 변형하여 만들어진 모델이다.
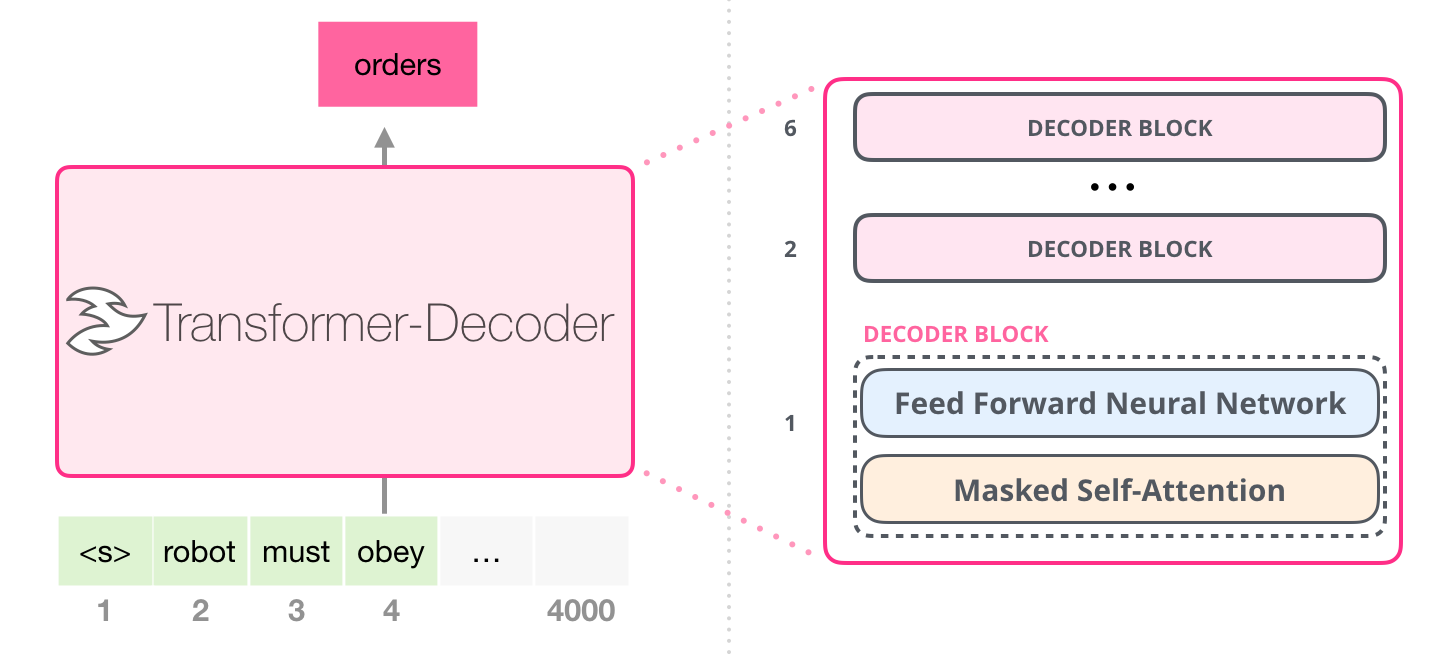
  • 두 모델은 사전 학습된 언어 모델(Pre-trained Language Model)이라는 공통점을 갖고 있다.
  • 사전 학습이란 대량의 데이터를 사용하여 미리 학습하는 과정이다. 여기에 필요한 데이터를 추가 학습시켜 모델의 성능을 최적화한다.
  • 이런 학습 방법을 전이 학습(Transfer Learning)이라고도 한다.
  • 최근 발표 언어 모델은 모두 전이 학습을 적용하고 있다.

GPT(2018.6)

Linear_Softmax

사전 학습된 언어 모델(Pre-trained LM)

Pre-training

  • 사전 학습 언어 모델은 크게 2가지 과정을 통해 완성된다.
  • 첫번째가 사전학습(Pre-traning)이다.
  • 책을 많이 읽는 것처럼 레이블링 되지 않은 데이터를 모델이 학습하도록 하는 과정을 사전학습이라고 한다.
  • 사전학습이 끝난 모델이 우리가 하고자하는 테스크에 특화된(Task specific) 데이터를 학습한다. 이를 Fine-tuning이라고 한다.

모델 구조

  • 아래는 GPT 모델 구조를 나타낸 그림이다.

Pre-training

  • 트랜스포머의 디코더(Decoder) 블록을 쌓아서 모델을 구성한다.
  • GPT에서는 12개의 디코더 블록을 사용했다.
  • GPT에서는 인코더를 사용하지 않기 때문에 디코더 블록 내에 2개의 Sub-layer만 있다.
  • 트랜스포머의 디코더 블록에는 Masked Self-Attention, Encoder-Decoder Attention, Feed-Forward 층이 있었다.
  • 하지만 GPT는 인코더를 사용하지 않기 때문에 Encoder-Decoder Attention 층이 빠지게 된다.

사전 학습(Pre-training)

  • 레이블링 되지 않은 대량의 말뭉치 $U = (u_1, \cdots , u_n)$ 에 대해 로그 우도 $L_1$을 최대화하는 방향으로 학습된다.
\[L_1(U) = \sum_i \log P(u_i \vert u_{i-k}, \cdots, u_{i-1}; \Theta)\]

Fine-tuning

  • 기존 모델에서는 테스크에 맞춰 모델 구조를 변경하고 학습을 진행시켰다.
  • 하지만 GPT와 같은 사전 학습 언어 모델은 Fine-tuning 과정에서 데이터의 입력 방식만을 변형시키고 모델 구조는 일정하도록 설계되었다.

fine-tune_structure

  • Fine-tuning은 레이블 된 말뭉치 $C = (x_1, \cdots , x_m)$에 대하여 로그 우도 $L_2$를 최대화 하는 방향으로 학습한다.
\[L_2(C) = \sum_{(x,y)} \log P(y \vert x_1, \cdots , x_m)\]
  • GPT의 경우 Fine-tuning에서 학습하는 데이터셋이 클 때 보조 목적함수로 $L_1$을 추가하여 $L_3$로 학습하면 더 잘 진행된다.

결과 & 결론

  • LSTM, GRU를 사용한 기존 모델보다 자연어 추론(NLI), 질의응답(QA), 분류(Classification) 등의 Task에서 높은 성능을 달성하였다.
  • GPT는 사전 학습된 언어 모델을 바탕으로 좋은 성능을 확보할 수 있다는 점과 사전 학습 모델에 Transformer 구조가 더 좋은 성능을 보인다.

BERT(Bidirectional Encoder Representation by Transformer)

  • 트랜스 포머의 인코더만을 사용하여 문맥을 양방향(Bidirectional)으로 읽어낸다.

BERT의 구조

  • GPT가 트랜스포머의 디코더 블록을 12개 쌓아올린 모델이었다면, BERT는 트랜스포머의 인코더 블록을 12개 쌓아올린 모델이다.

image

BERT의 Special Token(CLS, SEP)과 입력 벡터

image

Special Token: CLS, SEP

  • BERT에는 CLSSEP이라는 두 가지 Special Token이 있다.
      • 입력의 맨 앞에 위치하는 토큰이다.
      • 아래에서 등장할 NSP(Next Sentence Prediction)이라는 학습을 위해 존재한다.
      • BERT는 사전 학습 시에 텍스트를 두 부분으로 나누어 넣게 된다.
      • 첫 번째 부분의 끝자리와 두 번째 부분의 끝자리에 위치한다.

bert_input

Input Vector: Token Embeddings, Segment Embeddings, Position Embeddings

  • BERT는 3종류의 임베딩 벡터를 모두 더하여 모델에 입력한다.
    • Token Embeddings: 단어를 나타내는 임베딩이다. Word2Vec, GloVe, FastText 등으로 사전 학습된 임베딩 벡터를 사용한다.
    • Segment Embeddings
      • 첫 번째 부분과 두 번째 부분을 구분하기 위한 임베딩이다.
      • CLS 부터 첫 번째 SEP까지 동일한 벡터를 적용하고, 다음 토큰부터 두 번째 SEP까지 동일한 벡터를 적용한다.
      • Positional Embeddings: 단어의 위치를 나타내기 위한 임베딩이다.

BERT의 사전학습(Pre-training) 방법

  • BERT 역시 Pre-trained Language Model이기 때문에 사전 학습 이후에 Fine-tuning을 진행하게 된다.
  • BERT는 GPT와 다른 방식의 2가지 사전 학습(MLM, NSP)이 적용되었다.

MLM(Masked Language Model)

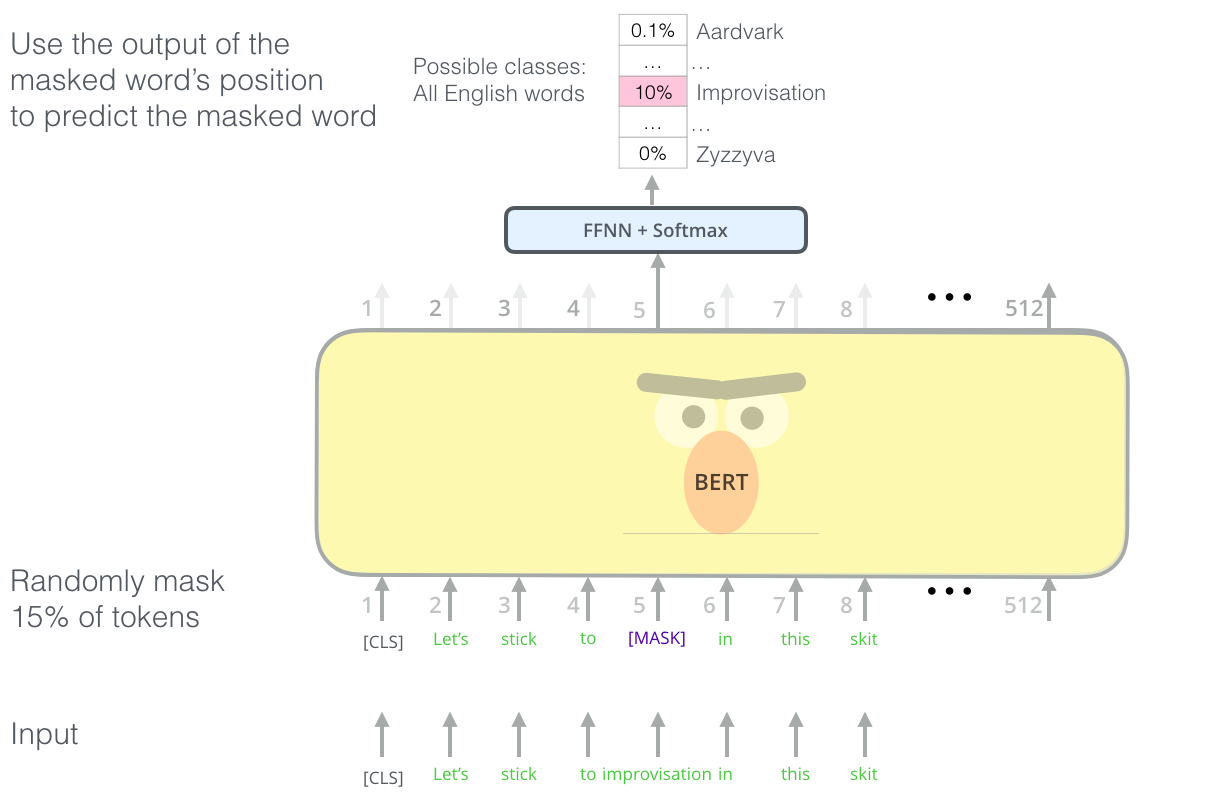
  • BERT는 빈칸 채우기를 하면서 단어를 학습한다.
  • BERT는 사전 학습 과정에서 레이블링 되지 않은 말뭉치 중에서 랜덤으로 15% 가량의 단어를 마스킹한다.
  • 마스킹된 위치에 원래 있던 단어를 예측하는 방식으로 학습을 진행한다.
mlm_example

  • MLM은 양쪽의 문맥을 동시에 볼 수 있다는 장점이 있다.
  • 아래 그림은 GPT와 BERT의 학습 방향을 비교하여 나타낸 그림이다.

gpt_vs_bert

  • GPT는 ‘거기’라는 단어를 예측할 때 ‘어제 카페 갔었어’의 정보만 볼 수 있다.
  • 하지만 BERT는 빈칸에 들어갈 ‘거기’라는 단어를 예측 할 때 ‘어제 카페 갔었어’뿐만 아니라 ‘사람 많더라’의 정보도 참고할 수 있다.
  • 이렇게 양방향으로 학습할 경우 단어가 문맥 사이에서 가진 의미를 최대로 학습할 수 있다.
  • MLM은 다소 간단한 아이디어지만 단어의 문맥적 의미를 최대로 학습할 수 있도록 함으로써 BERT가 높은 성능을 달성하는 데 커다란 역할을 했다.

NSP(Next Sentence Prediction)

  • BERT는 NSP(Next Sentence Prediction) 방식으로도 학습한다.
  • NSP는 모델이 문맥에 맞는 이야기를 하는지 아니면 동문서답을 하는지를 판단하며 학습하는 방식이다.
  • SEP 토큰 왼쪽의 문장과 오른쪽의 문장이 바로 이어지는 문장일 경우 CLS 토큰의 출력이 IsNext로 되도록 학습한다.
  • 두 문장이 이어지지 않는 쌍일 경우 출력 벡터가 NotNext로 나오도록 학습한다.
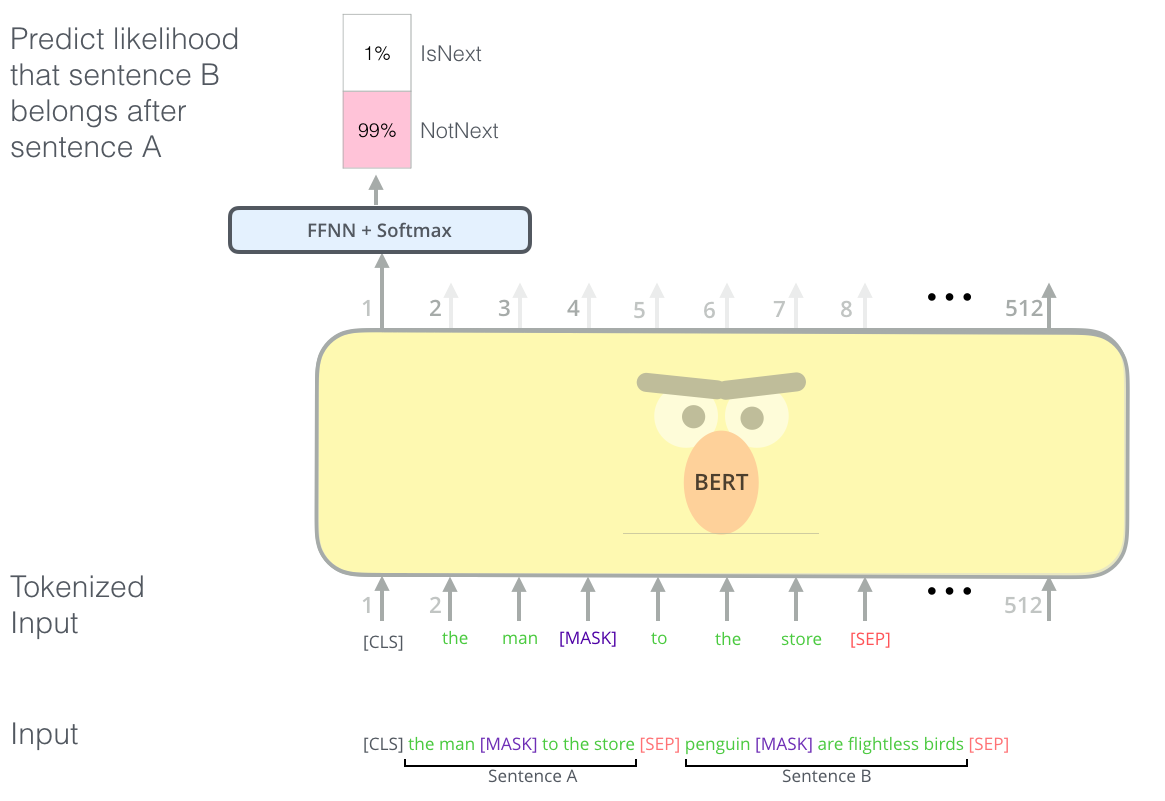
nsp_1

  • 아래는 드라마 대본을 예시로 NSP가 어떻게 작동하는 지를 나타낸 그림이다.

nsp_2

nsp_3

  • NSP 역시 간단한 아이디어다.
  • 모델이 문장과 문장 사이의 관계를 학습할 수 있도록 함으로써 질의응답(QA), 자연어 추론(NLI) 등 문장 관계를 이해해야만 하는 복잡한 Task에서 좋은 성능을 나타내는 역할을 했다.
Fine-tuning
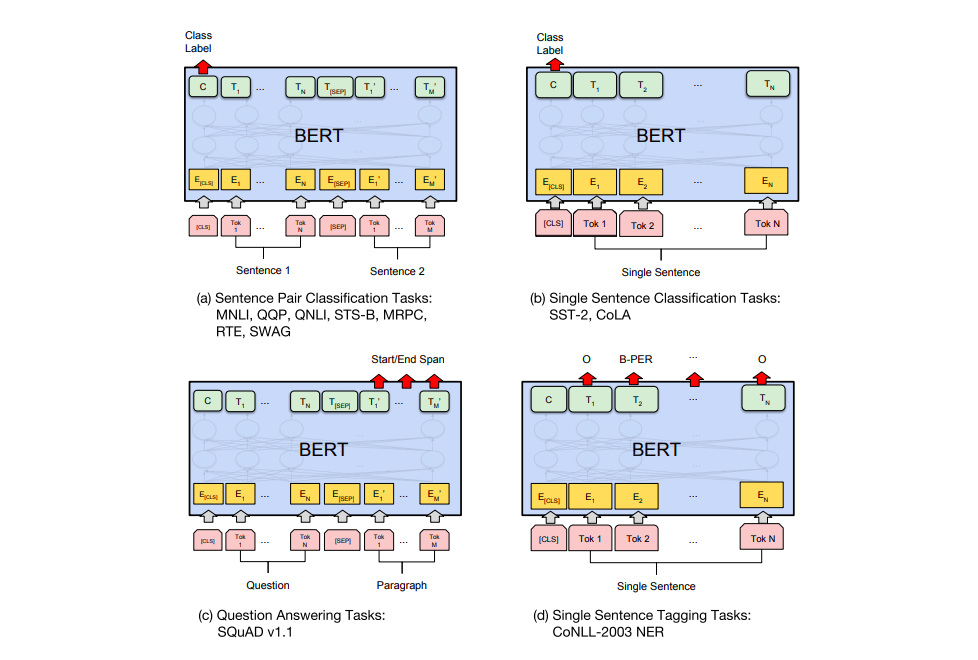
  • BERT 역시 모델의 구조는 그대로 유지한 채 데이터를 입력하는 형태만 바꾸어서 Fine-tuning을 실시한다.
nsp_2

  • (a)는 “Sentence” 쌍을 분류하는 테스크이다. [SEP]으로 나눠진 “Sentence” 쌍을 입력받아 [CLS]가 출력하는 클래스를 반환한다.
  • (b)는 감성분석 등 하나의 문장을 입력하여 [CLS]로 해당 문장을 분류하는 테스크이다.
  • (c)는 질의 응답 테스크이다. 질문과 본문에 해당하는 단락을 [SEP] 토큰으로 나누어 입력하면 질문에 대한 답을 출력하도록 한다.
  • (d)는 품사 태깅(POS tagging)이나 개체명 인식(Named Entity Recognition, NER) 등의 테스크이다. 입력받은 각 토큰마다 답을 출력한다.
결과 & 결론
  • BERT는 간단한 사전 학습 아이디어로 많은 테스크에서 SOTA를 달성하였다.
  • 단순한 아이디어를 통해 엄청난 성능을 달성하였기에 당시 많은 충격을 주었다.
  • 이후로도 BERT를 개선하기 위한 연구가 많이 진행되었다.
  • 특히 MLM을 통해 BERT가 좋은 성능을 달성한 뒤로 텍스트에 노이즈를 준 후 이를 다시 맞추는(Denoising) 방법에 대해 많은 연구가 진행되었다.

Post BERT(최근 NLP 연구 방향)

더 큰 모델 만들기

getting_bigger

  • GPT와 BERT 이후로도 수많은 모델이 발표되어 왔다.
  • 두 모델 이후로 발표되고 있는 모델의 주요 경향성 중 하나는 모델 크기 키우기이다.
  • 위 그림에서 볼 수 있듯 GPT와 BERT 이후 발표되는 모델의 파라미터 수는 기하급수적으로 증가하고 있다.
  • 크기가 커지면 사전 학습에 따른 비용이 많이 들고 그만큼 많은 학습 데이터를 확보해야 한다.
  • 이런 제약사항 때문에 초대형 모델은 학계보다는 구글, 페이스북 같은 대기업에서만 이루어지고 있다.
  • 큰 모델에 비해 그렇지 못한 모델이 좋은 성능을 보장하지 못하기 때문에, 학계에서는 상대적으로 뒤처질 수 밖에 없게 된다.
  • 이런 사태가 계속되면서 크기만 커지는 모델에 대한 우려의 시각도 있다.

getting_bigger_gpt3

더 좋은 학습 방법 적용하기

  • 여전히 더 좋은 학습 방법을 연구하고자 하는 움직임도 계속되고 있다.
  • 특히 기존 GPT나 BERT의 단점을 보완하는 방향으로 많은 연구가 진행되고 있다.
  • 트랜스포머의 디코더 블록만을 사용한 GPT는 상대적으로 자연어 생성과 관련된 테스크에,
    인코더 블록만을 사용한 BERT는 자연어 이해와 관련된 테스크에 특화되어 있다.
  • GPT와 같이 순차적으로 자연어를 생성하는 모델에는 AR(Auto-Regressive)한 방법이 적용되었고,
    BERT와 같이 노이즈를 맞추어가는 방식으로 자연어를 이해하는 모델에는 AE(Auto-Encoder)한 방법이 적용되었다.
  • 두 모델이 사용했던 방법을 결합(AE+AR)한 모델로 XLNet이나 BART가 있다.
  • 두 모델 모두 자연어 이해와 생성 모두에서 좋은 성능을 보이며 특히 BART는 요약 테스크에서 좋은 성능을 보인다.
  • 다른 방향의 개선으로는 BERT의 Noising 방법을 어렵게 만든 모델이 있다.
  • 대표적인 모델로 Masking 방법에 변화를 주는 SpanBERT, RoBERTa와 같은 모델이 있다.
  • 아래는 BART 모델이다.

bart

  • AE와 AR이 모두 적용되었다.
  • 게다가 BART는 Masking 뿐 아니라 Permutation, Infilling 등 다양한 Noising 방법이 적용되었다는 특징을 가지고 있다.

bart_noising

보다 가벼운 모델 만들기

  • GPT와 BERT 기본 모델이라도 크기가 꽤 크다 보니 사이즈를 줄이되 성능은 보전하는 경량화로도 많은 연구가 진행되고 있다.
  • DistillBERT, ALBERT(A Light BERT) 나 ELECTRA가 이런 방향으로 연구된 대표적인 모델이라고 할 수 있다.
  • 세 모델 모두 각자만의 방법을 이용해서 BERT의 크기(=파라미터 수)를 많이 줄이고 성능은 어느정도 보존함으로써 모델 효율성을 높였다.
  • 아래는 ELECTRA의 모델 구조이다.
  • 다음 시간에 배울 GAN에 등장하는 방법론을 적용하여 BERT보다 적은 리소스를 활용하여 더 높은 성능을 기록하였다.

bart_noising

여러 방면에서의 다양한 시도

다양한 테스크를 수행할 수 있는 모델(Meta Learning)

  • T5나 GPT-3와 같은 모델은 하나의 모델로 다양한 테스크를 수행할 수 있는 모델이다.
  • 특히 GPT-3는 Few-shot learning 방법론을 적용한 모델로 적당한 길이의 제시문만 주어주면 Fine-tuning 없이도 엄청나게 좋은 성능을 보여준다.
  • N-shot learning에 대해서는 아래 자료를 참고하면 된다.
  1. 파인튜닝(finetuning) : 다운스트림 테스크에 해당하는 데이터 전체를 사용한다. 모델 전체를 다운스트림 데이터에 맞게 업데이트한다.
  2. 제로샷러닝(zero-shot learning) : 다운스트림 테스크 데이터를 전혀 사용하지 않는다. 모델이 바로 다운스트림 테스크를 수행한다.
  3. 원샷러닝(one-shot learning) : 다운스트림 테스크 데이터를 한 건만 사용한다. 모델 전체를 1건의 데이터에 맞게 업데이트한다. 업테이트 없이 수행하는 원샷러닝도 있다. 모델이 1건의 데이터가 어떻게 수행되는지 참고한 뒤 바로 다운스트림 테스크를 수행한다.
  4. 퓨샷러닝(few-shot learning) : 다운스트림 테스크 데이터를 몇 건만 사용한다. 모델 전체를 몇 건의 데이터에 맞게 업데이트한다. 업데이트 없이 수행하는 퓨삿러닝도 있다. 모델이 몇 건의 데이터가 어떻게 수행되는지 참고한 뒤 바로 다운스트림 테스크를 수행한다.

다국어(Multilingual) 모델

  • 다국어 모델 역시 열심히 연구되고 있는 분야이다.
  • 일반적인 언어 모델의 경우 단일 말뭉치로만 사전 학습을 진행하는 경우가 많다.
  • 그렇기 때문에 사전 학습된 언어 외에 다른 언어를 사용하면 성능이 급격히 저하되는 경우가 많다.
  • 예를 들어, 영어로 학습된 GPT-3 모델에 한국어를 집어넣으면 거의 이해하지 못하게 된다.
  • 이러한 문제를 뛰어넘기 위해 다양한 언어를 넘나들며 사용할 수 있는 모델이 연구되고 있는데 이를 다국어 모델 이라고 한다.
  • 대표적인 다국어 모델로는 mBART(multi-lingual BART), mT5(multi-lingual T5) 등이 있다.

자연어를 넘어(1): 컴퓨터 비전(Computer Vision, CV)에서의 트랜스포머

  • 트랜스포머는 원래 자연어처리 중 번역 테스크에 적용하기 위해서 나온 모델이었다.
  • 하지만 최근에는 컴퓨터 비전 테스크인 이미지 처리에서도 트랜스포머를 적용하고자 하는 움직임이 나타나고 있다.
  • ViT(Vision in Transformer) 논문에서는 컴퓨터 비전 분야에서 SOTA인 CNN 계열 모델보다 트랜스포머가 더 좋은 성능을 나타냈다고 말하고 있다.
  • 아직 컴퓨터 비전 분야에서는 CNN에 비해 개발 속도가 더딘 편이지만, 트랜스포머를 사용하여 비전과 자연어 모두 정복하기 위한 다양한 시도가 지금도 진행되고 있다.

자연어를 넘어(2): 멀티 모달(Multi-modal) 모델

  • 지난 1월에는 GPT를 발표했던 OpenAI에서 DALL-E 와 CLIP 이라는 재미있는 모델을 발표했다.
  • 이 모델은 텍스트(문장)를 입력받아 상응하는 이미지를 생성한다.
  • 아래는 DALL-E 가 “an armchair in the shape of an avocado” 라는 문장을 입력받은 뒤 출력한 이미지이다.

dall-e

  • 이렇게 자연어를 넘어 다양한 매체로 기계와 소통하는 태스크를 멀티모달(Multi-Modal)이라고 합니다.
  • 트랜스포머가 자연어처리 뿐만 아니라 컴퓨터 비전에 대해서도 좋은 성능을 보이기 때문에 트랜스포머를 활용한 멀티모달 연구도 활발하게 진행되고 있다.

References

0%